|
|
|||||||
| The Folding Knife (& Switchblade) Forum The materials, techniques and the designing of folding knives. |
 |
|
|
Thread Tools | Display Modes |
|
#31
 01-09-2010, 09:08 PM
|
|||
|
|||
|
Quote:
JLaw Last edited by JLaw; 01-09-2010 at 09:11 PM. 
|
|
#32
02-04-2010, 03:54 PM
|
||||
|
||||
|
I order Chris Crawfords DVDs and supplies to make some slip joints. While waiting I bought one of the waterjet kits from Midwest. I am trying to fit it up and I cant seem to find my answer. Is the back of blade and the spring suppose to be a perfect match together when opened ? The waterjet kit has a slight slope to the back of the blade. Do i cut that to fit liner ? or cut liner to fit the black of the blade ?
THANKS ! Dave
|
|
#33
02-04-2010, 06:13 PM
|
|||
|
|||
|
Dave, I'm not completely sure precisely what you're asking, so I'll cover the issues with a waterjet cut kit first. A waterjet doesn't cut steel completely square/perpendicular -- there is always a slope to the cut relative to the face of the material. But never mind that for the moment: the very first thing to do is to make sure all your parts are *flat* - check them on some very flat surface (a pane of glass will work if you don't have anything else) and make them as flat as you can. If they're not quite flat, a small soft face hammer (rawhide, rubber, plastic,...) and a very firm but not hard surface will work for this -- very firm rubber or a firm leather will work as backing. Next, you need to square all the waterjet cut edges with their faces -- carefully - don't take off any more than needed to do that (I wouldn't worry about the liners other than to make sure they're flat, you'll have to shape them to your blade and spring later anyway). Is this part of what you were asking about?
Now about how the spring and the backsquare of the blade should fit together (the backsquare is the "square" notch where the spring fits into the tang when the blade is open; the vertical part of it that meets the back of the blade is called the runup) -- in spite of it's name, the backsquare is not supposed to be totally square - it should contact the spring at the corner of the tang and the top of the runup -- otherwise there should be a bit of space between the spring and the backsquare (to allow lint/dirt/whatever to get in there without messing up the action, to make it much easier to fit the blade to the spring, and to make the action more solid and snappy). The backsquare is therefore cut at an angle that is a bit less than 90 degrees - it slopes downwards from the corner of the tang about 3 degrees (give or take a degree or so, depending on who you talk too) -- the runup may also be sloped a bit to help with making the "two point" fit to the spring. -- Dwight Last edited by zerogee; 02-04-2010 at 06:21 PM.
|
|
#35
02-04-2010, 07:10 PM
|
||||
|
||||
|
Kurt-
Thanks for posting this! I think you have inspired quite a few of us "folder newbs". I love seeing the work that Don Robinson & crew do; and even though they explain everything in great detail (reference the Texas toothpick thread) it's sometimes hard to believe that I can even come close to repeating it. Very few makers are brave enough to post a step by step of anything they haven't done many, many times. Not only did you post it, but you achieved great success. -Dave __________________ www.ruhligknives.com "The choice isn't between success and failure; it's between choosing risk and striving for greatness, or risking nothing and being certain of mediocrity." - Keith Ferrazi
|
|
#36
02-04-2010, 07:40 PM
|
|||
|
|||
|
Quote:
This one shows a possible fitup with a squared off spring - note the small down angle from the corner of the tang to the runup. 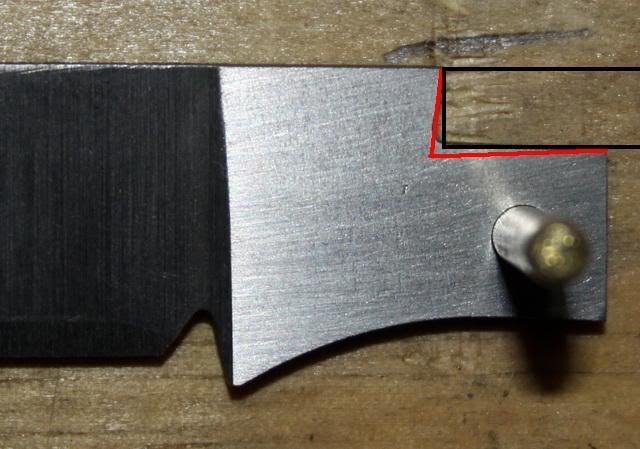 This one shows a fitup with the runup more nearly squared to the blade back and the spring *end* angled a bit (again, angles are exaggerated here) -- this is what I prefer since it gives a much less "sharp" corner sticking up when the blade is closed. Although my crude drawing doesn't show it, you should slightly radius the corner of the spring that's inside the backsquare. Still though, you want the 3 degree downward angle of the backsquare relative to the square tang end. 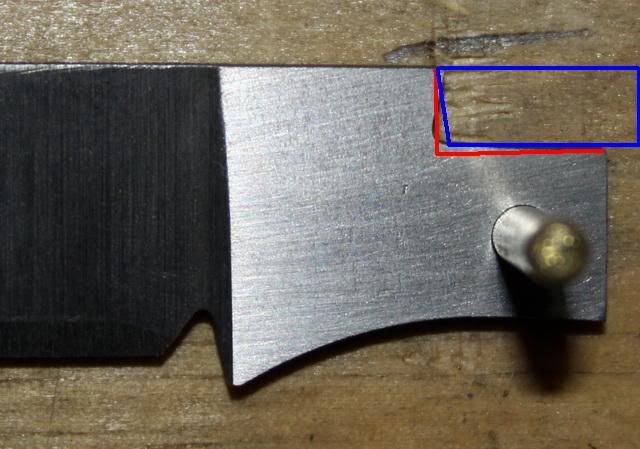 You don't really want to do much messing about with the bottom of the spring where the tang will make contact as it moves -- you want this part of the spring as flat and square as you can get it. You can mess about a bit with the end of the spring though - and slightly radiusing the inside corner of the spring is usually a good idea regardless. Also, don't get too literal when applying the "two point principle" here -- having each point of contact actually be a small flat area is fine. Last edited by zerogee; 02-04-2010 at 08:31 PM.
|
|
#37
02-04-2010, 08:01 PM
|
||||
|
||||
|
Dave and Dave, thank you! I plan on doing a much more detailed WIP when I build my next one in a week or so.
Dwight, thank you for jumping in! I hope to cover this (painfully discovered) issue in the aforementioned WIP. 
__________________ Kurt Huhn pipecrafter@pipecrafter.com http://www.pipecrafter.com
|
|
#38
02-04-2010, 11:36 PM
|
|||
|
|||
|
Dave, basically Dwight hit it right on the notch so to speak. The First assembly shot is the one most preferred by folder makers, (NOTE: the spaces are there but don't show but just a very slight opening or gap (AND I DO MEAN SLIGHT) ). As you do more slip-joint folders you will see this. If you make the gap to little (as in none), or to much there is a chance of the spring failing (more so with to much than not enough. If you go by what Dwight showed you you should be fine. What type of steel is it that you are using? Also, Who will be doing the heat treating?
This is when knowing the proper tempering of the steels for the spring comes into play. If you are not doing the heat treat yourself then make sure they temper the spring properly. Curtis __________________ Curtis Wilson Wilson's Custom Knives, Engraving, and Scrimshaw
|
|
#40
02-05-2010, 02:04 PM
|
||||
|
||||
|
I worked on it today. Might have worked TOO MUCH. Ive cut the backsquare too deep and my blade is higher now. I guess I can reprofile the blade a little and correct this ? Here is the rest of it.
And THANK you for the detail edit of my pics ! thats awesome   
|
|
#41
02-07-2010, 01:06 AM
|
|||
|
|||
|
Dave that has happened to more of us than we care to say. Bring the blade spine down a bit shouldn't be a big problem. Keep working on it, and it should come togather OK.
Curtis __________________ Curtis Wilson Wilson's Custom Knives, Engraving, and Scrimshaw
|
|
#42
02-07-2010, 01:39 AM
|
|||
|
|||
|
One thing to check before doing much more is see how high the spring is at half stop relative to full open -- if the half stop has to be shortened, this will further drop your spring, and require still more to be removed from the back of the blade. Other things to look at: see what "dropping" the center pin down a bit relative to the pivot pin will do for you (I'm assuming you haven't drilled the liners yet) -- you're basically seeing if you can raise the end of the spring up the runup some and minimize the amount you'll need to take off of the blade back (which of course drops the rest of the spring, sorta). Unfortunately the center pin is basically at the center of the knife -- if it was further back, you could bring the center pin toward the pivot pin a bit, shorten the spring and take advantage of the taper to make the spring wider at the end (you would need to compensate later by removing some of depth of the spring closer to the center pin to make it a bit less stiff).
The old time cutlers would probably get out their hammer and a blunted cold chisel and use it along the center line on both sides of the spring from the end back thru the "walk" area to "widen" the spring there -- if this was A2 or O1 I'd say it was worth the experiment - ATS34, probably not. A similar thing could be done with a punch just inside the back corner of the backsquare and the halfstop, lifting the point of contact there with the spring - but again, in ATS34, probably not so much. -- Dwight Last edited by zerogee; 02-07-2010 at 01:53 AM.
|
|
#43
02-07-2010, 07:55 AM
|
||||
|
||||
|
This happened to me on the second slipjoint I made, and I corrected the problem by reshaping the blade and bringing the spine down to the spring. Luckily I hadn't put a bevel on the blade yet, so impact was minimal. I think it was right at that moment that I realized why fitup was done prior to bevel grinding in every tutorial and WIP I had read.
__________________ Kurt Huhn pipecrafter@pipecrafter.com http://www.pipecrafter.com
|
|
#44
02-08-2010, 10:48 AM
|
|||
|
|||
|
Nice thread Kurt! Not to change the subject but those pipes you make are great! I think If I could afford one I would start smoking again. Will we be seeing some of that Briarwood (I think thats what you call it) on your knives soon.
|
|
#45
02-08-2010, 12:26 PM
|
||||
|
||||
|
Thank Kirby! If all goes well in the next few days, yes. I have a couple knives in the works, and I wanted to get away from all the G10 and micarta I've been using.
__________________ Kurt Huhn pipecrafter@pipecrafter.com http://www.pipecrafter.com
|
|
| Tags |
| blade, brass, folder, folding knife, kit, kits, knife, knives, pocket knife, supplies |
| Currently Active Users Viewing This Thread: 1 (0 members and 1 guests) | |
|
|
 Similar Threads
|
||||
| Thread | Thread Starter | Forum | Replies | Last Post |
| My first slipjoint - a big one! | Ruben Calo | The Display Case | 5 | 03-07-2010 05:05 PM |
| Slipjoint #6 | Jason Cutter | The Display Case | 5 | 12-14-2005 07:59 AM |
| Bob Ogg slipjoint... | Coop747 | The Display Case | 17 | 06-30-2002 09:36 PM |


 Linear Mode

