|
|
|||||||
| The Newbies Arena Are you new to knife making? Here is all the help you will need. |
 |
|
|
Thread Tools | Display Modes |
|
#16
 07-11-2014, 03:33 PM
|
||||
|
||||
|
This is a good point about heat, but I did the engineering behind it.
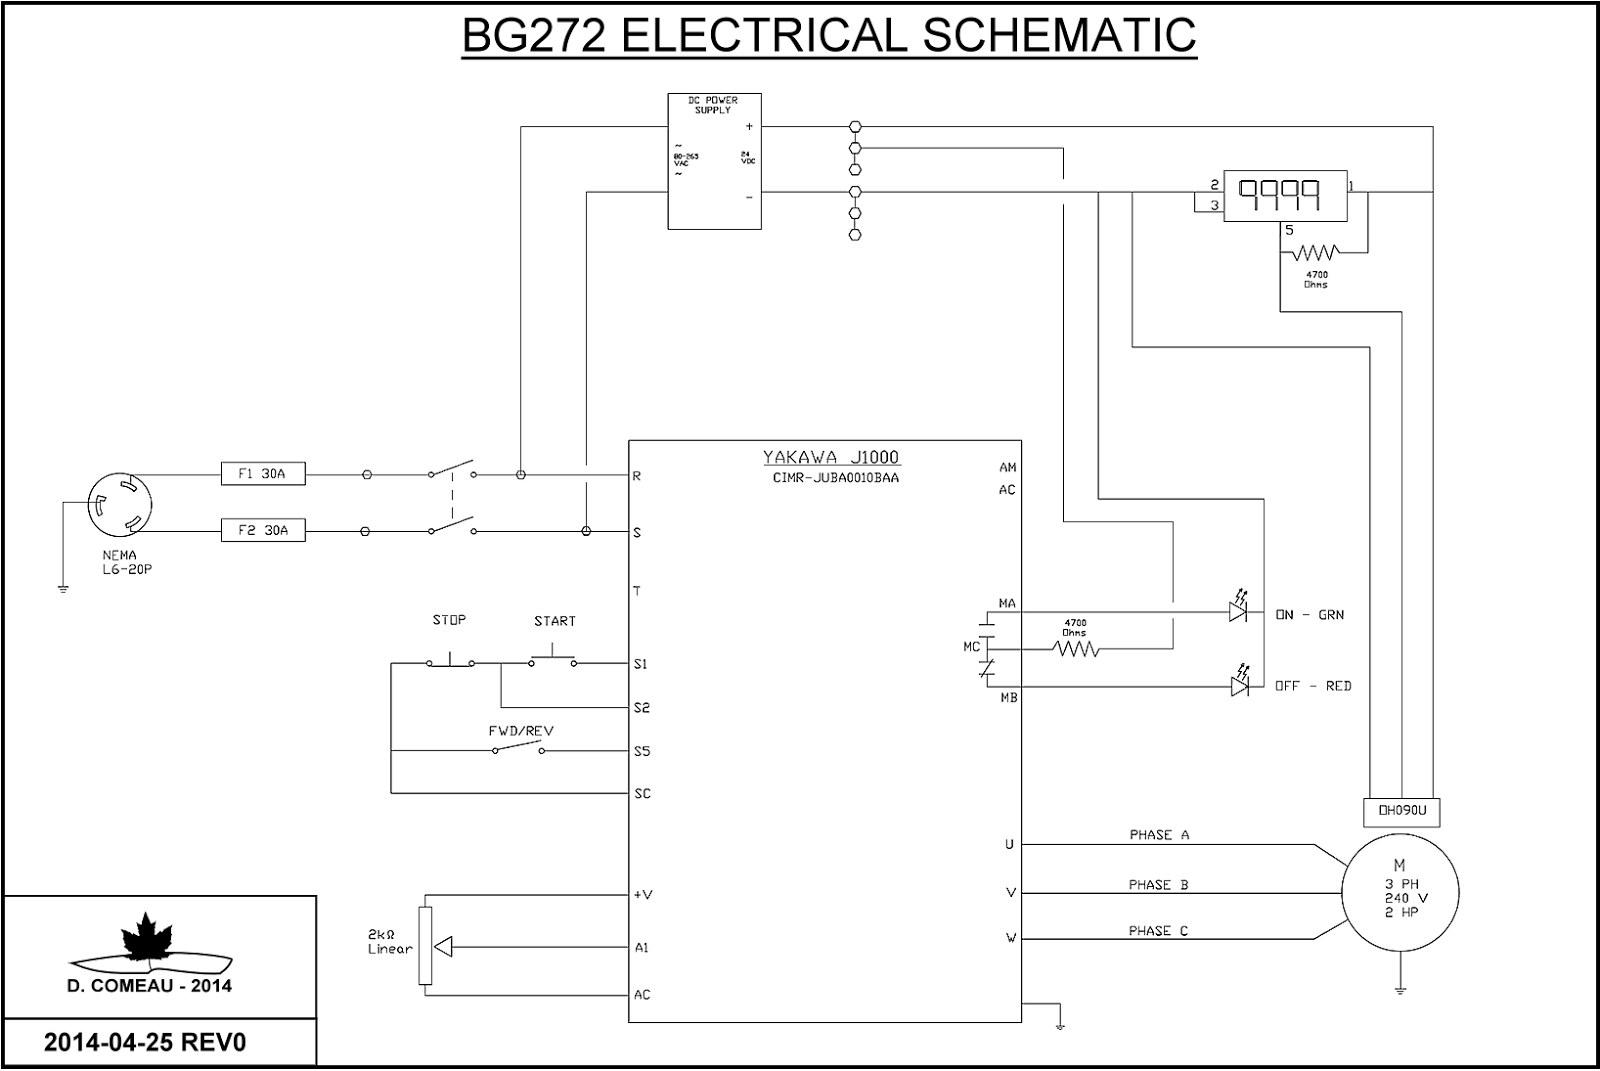
The main reason for my choice of enclosure was the ingress protection rating. I chose a NEMA 4/IP65 rating (sealed), because I didn't want any dust getting in whatsoever. This also meant I'd need a large enclosure. All enclosures have inherent heat dissipation properties. Even non-metallic ones, although they suck at it, have a K factor between 1.5 and 3. The published heat loss of my VFD is 81.4 Watts. I didn't want the inside of the box to ever be more than 10?C (18?F) above ambient. On other words, on a really hot day, I didn't want it to go above 50?C (122?F) inside the box. What it boils down to (pardon the pun) is surface area of the enclosure, the K factor of the material, wall thickness and the difference between inside and outside of the box. As empirical research, I put a small digital thermometer inside the enclosure and ran the grinder at various speeds and loads for about 45 minutes. I was able to observe a 4?C (7?F) temperature rise at around 20?C(68?F) ambient. That was good enough for me. As a backup, the Yaskawa VFDs have a fixed high heatsink temperature alarm that will shut the VFD down if it gets too hot. This is for then the fan fails. A enclosure rated NEMA 3R would have afforded me a much smaller enclosure with a fan, vents and filter(s), but dust will eventually get in and yes, eventually kill the fan. A steel NEMA 4 enclosure is the ideal way to go, but ultimately more expensive. I hope to have some of the q' formula and example calculations on my blog one day. Dan 
|
|
#17
07-12-2014, 11:21 AM
|
||||
|
||||
|
Here is 5 Photos of mine . http://imgur.com/BSMnVIc,Untvt0L,9Bv...Ba9M,TRNNnj2#0
as you see in the first two photos the box is where the controller is housed , the bottom has a 2 micron filter under the controller where the fan pulls fresh air in to the box . the 2nd photo shows the unit sealed and is closed up . the 4th shows the "exhaust vents cut @ a 45 Degree" up-ward to expel the air . My KMG Clone is Built Extremely heavy with modifications to suite / help me with its us and very little to no maintenance at all . using the best of the best while I redesigned it and the bearings and moving parts making them all serviceable and most important I use "Molly Grease" the motor is a sealed unit as well . your grinder looks good . Should you or anyone need any help with building one feel free to ask any questions . If I can help , I will . __________________ R. Yates 13 & On Forge Live and Let Live , Do Not trespass on Life or Me! As we are not so kind or forgiving !
|
|
#20
07-16-2014, 04:55 PM
|
||||
|
||||
|
Quote:
__________________ R.Watson B.C. Canada
|
|
#21
07-17-2014, 01:10 PM
|
||||
|
||||
|
Thank you Brother Rob , I hope to have My New Shop finished and get things set up in it in a few months . I have a big slab of PW Steel to attempt to beat into a 32 in blade with an 8 in handle when things are set up to run . it is NOT going to be very traditional though . I have wanted to do this build for well over 30 years and the PW steel has been crying to me to finish it for a few years now . Yes I will do a WIP on this for those that have been looking to see my work .
__________________ R. Yates 13 & On Forge Live and Let Live , Do Not trespass on Life or Me! As we are not so kind or forgiving !
|
|
#22
02-02-2015, 11:44 PM
|
||||
|
||||
|
The latest attachment. Grizzly 10" pressed on some 3/4" DOM tube and set in 3/4" pillow blocks. Total bill about $150 with freight.
 With basic How-To and Bill of Materials on my blog. Love that Scotch-Brite belt too! Dan
|
|
#23
02-03-2015, 08:19 AM
|
||||
|
||||
|
Looks terrific! Did the Grizzly wheel run true and smooth or did you have to tweak it ?
__________________ Your question may already have been answered - try the Search button first!   
|
|
#24
02-03-2015, 08:42 AM
|
||||
|
||||
|
The wheel itself appears to be fairly well balanced. Of course, I had to align the bearings and ensure the shaft was perpendicular to the belt path, but nothing more than some small alignment tweaks. Gotta love the price of it!
Dan
|
|
| Tags |
| 2x72, back, bee, belt, blaze, build, building, digital, diy, grinder, grinding, hot, kit, knife, knives, made, making, material, motor, post, steel, surface, tools, vfd, wheels |
| Currently Active Users Viewing This Thread: 1 (0 members and 1 guests) | |
|
|
 Similar Threads
|
||||
| Thread | Thread Starter | Forum | Replies | Last Post |
| My new belt grinder build | thinwater | Tool Time | 7 | 01-16-2020 03:46 AM |
| my grinder build | s mcfall | Tool Time | 5 | 11-17-2013 06:05 AM |
| Grinder in a Box build | dbrunson | The Newbies Arena | 1 | 02-01-2012 07:51 PM |
| New domain/site up and running......Finally! | Ed Caffrey | Ed Caffrey's Workshop | 1 | 04-30-2002 05:47 AM |
| preparing to build a grinder... | BenMcDaniel | Tool Time | 5 | 02-25-2002 12:15 PM |


 Linear Mode

