|
|
|||||||
| The Newbies Arena Are you new to knife making? Here is all the help you will need. |
 |
|
|
Thread Tools | Display Modes |
|
#1
 06-05-2012, 10:08 PM
|
||||
|
||||
|
Graduation
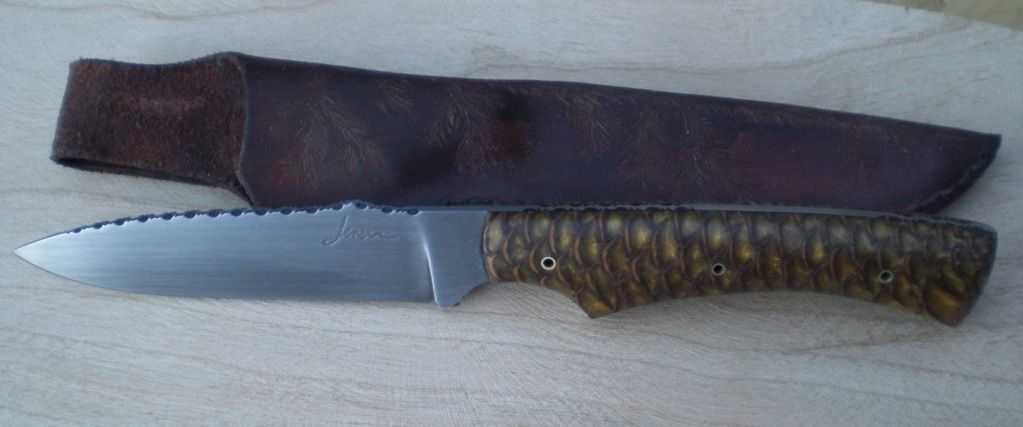
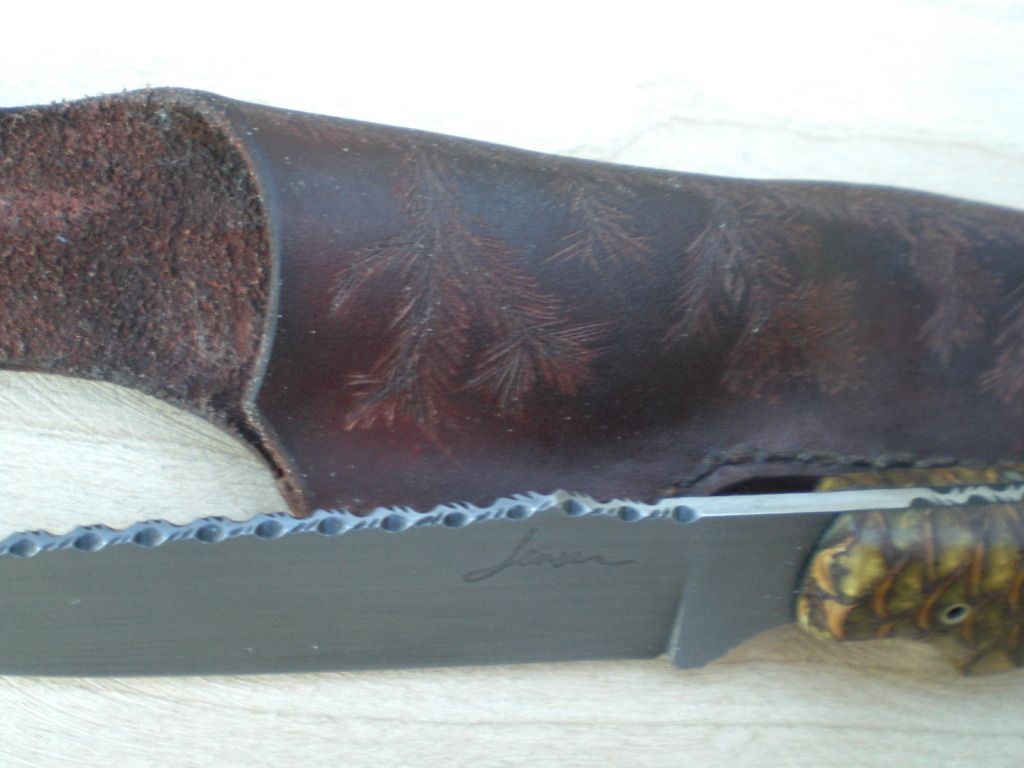
So lately the theme has been graduation. I graduated college three weeks ago with a B.S. in Forestry and a certificate in Human Dimensions of Forest Management. I also feel like I've hit a big milestone in my knife making. So I've sort of decided to graduate myself from beginner/novice to intermediate. Here are the last two knives I've made, and the end of what I like to think of as my first series, first generation knives, or "the early years." I made my first blade 1-1/2 years ago. Lately I have been spending much less time making knives and much more time in development and research, involving but not limited to bronze casting/working, brazing, new guard designs, and working on bringing my sheath work up to par (still gettin' there!).
The first knife has been in the works for a year now. My professor commissioned it and I originally made the blade from D-2. Texasknife lost it in their facility, and then mailed it to the wrong person. Got it eventually and handsanded it only to have mysterious pitting. Ground it out, appeared again. Was well oiled and put away. Remade it out 1084, differentially hardened. Sole authorship was the only way I could guarantee the work. African blackwood handles with 416 SS bolsters, spacers, and corby rivets. Double vine filework on blade spine and handle spine. Filework cuts on the blade spine are cold blued for extra corrosion resistance and visual contrast. Again, sheathwork needs improving, but getting there. 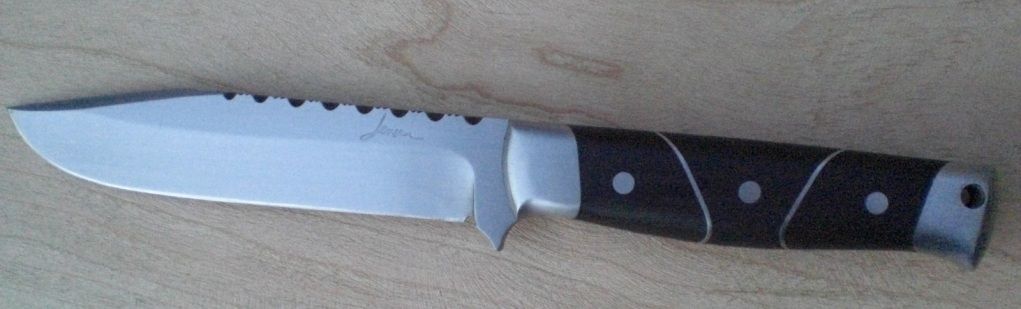 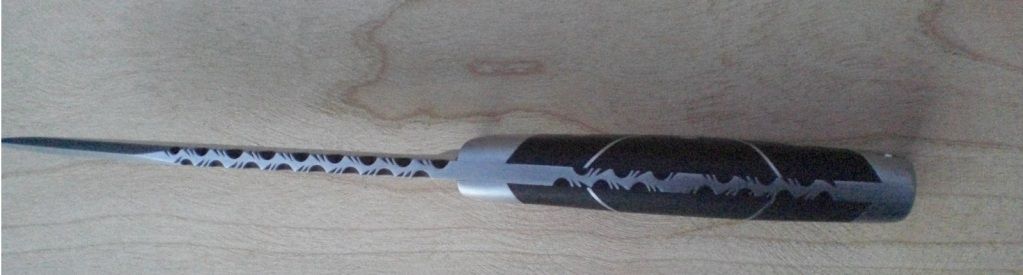 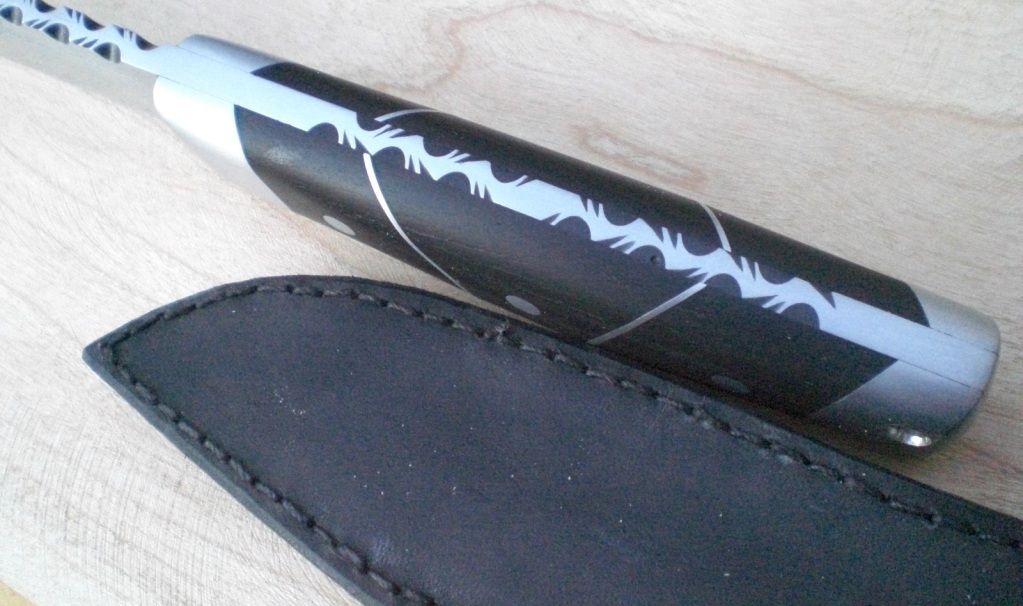 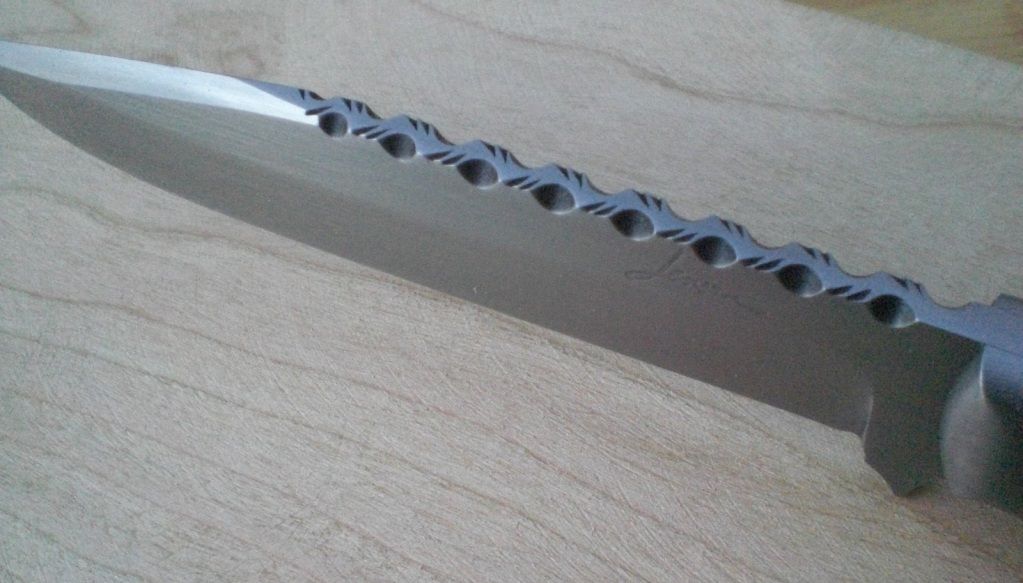 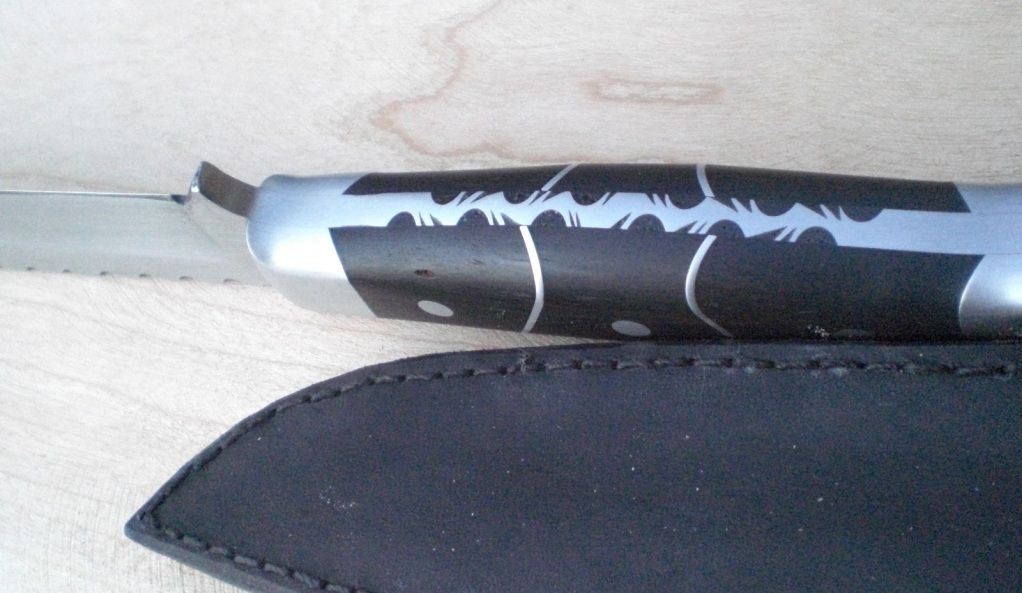 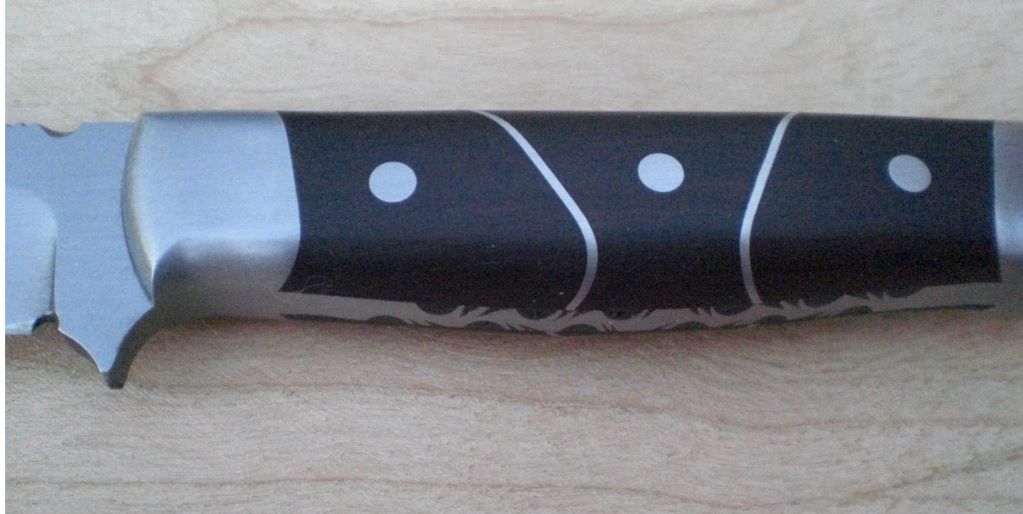 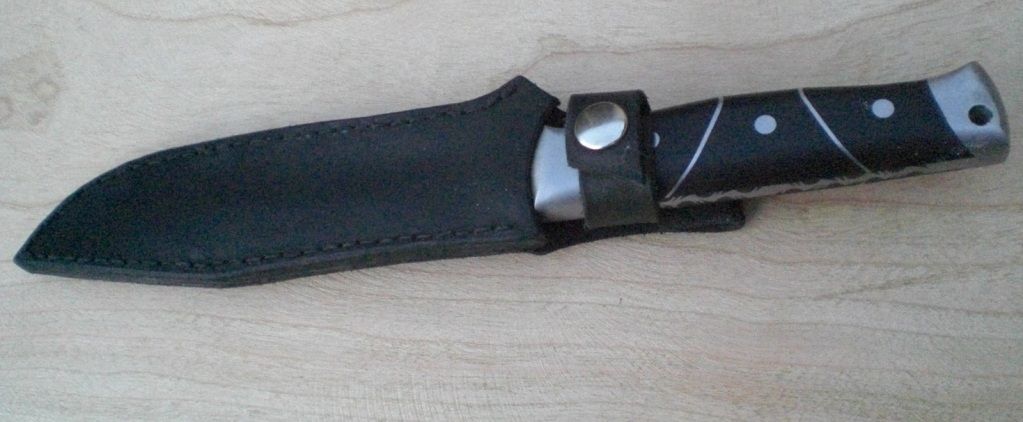

|
|
#2
06-05-2012, 10:15 PM
|
||||
|
||||
|
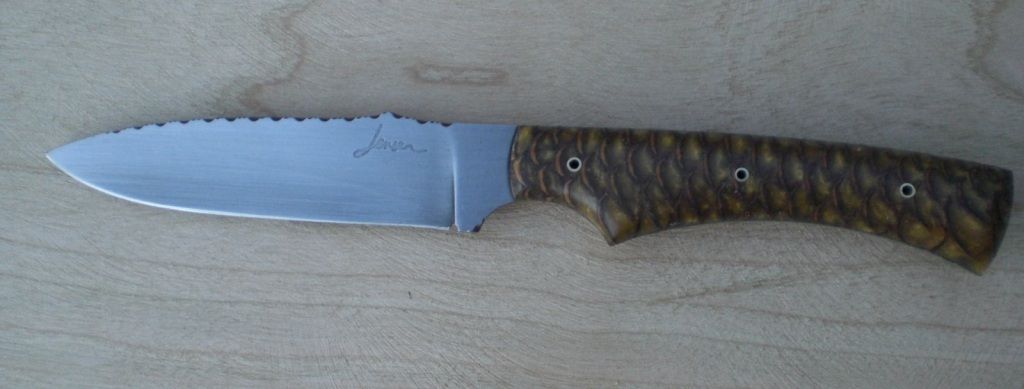
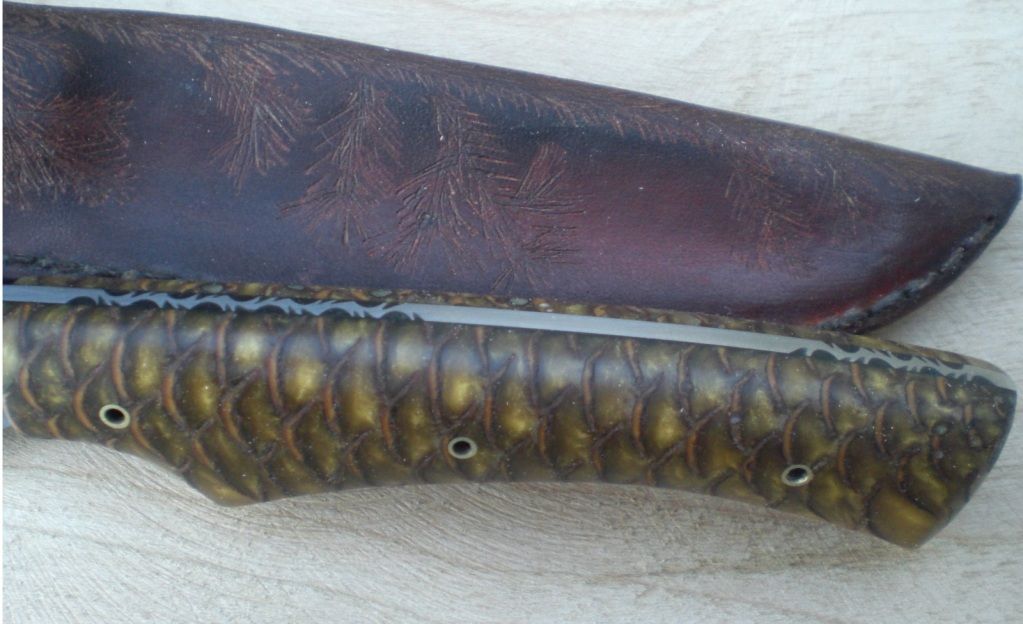
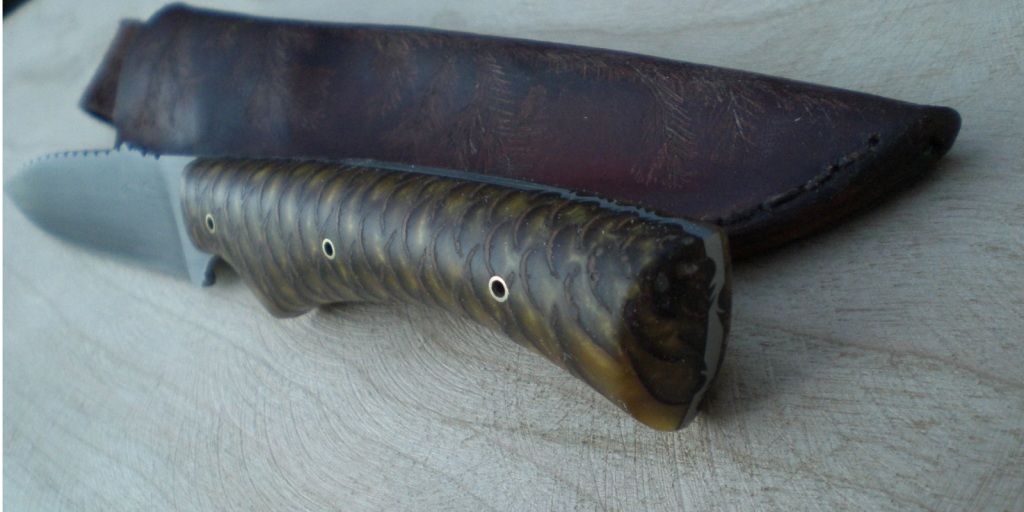
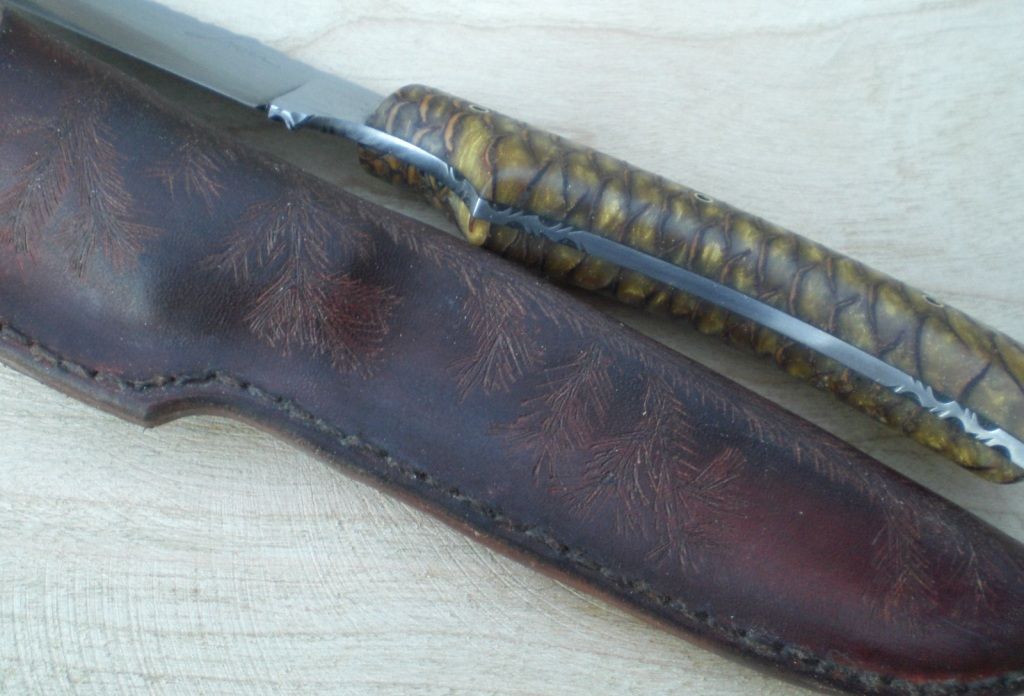
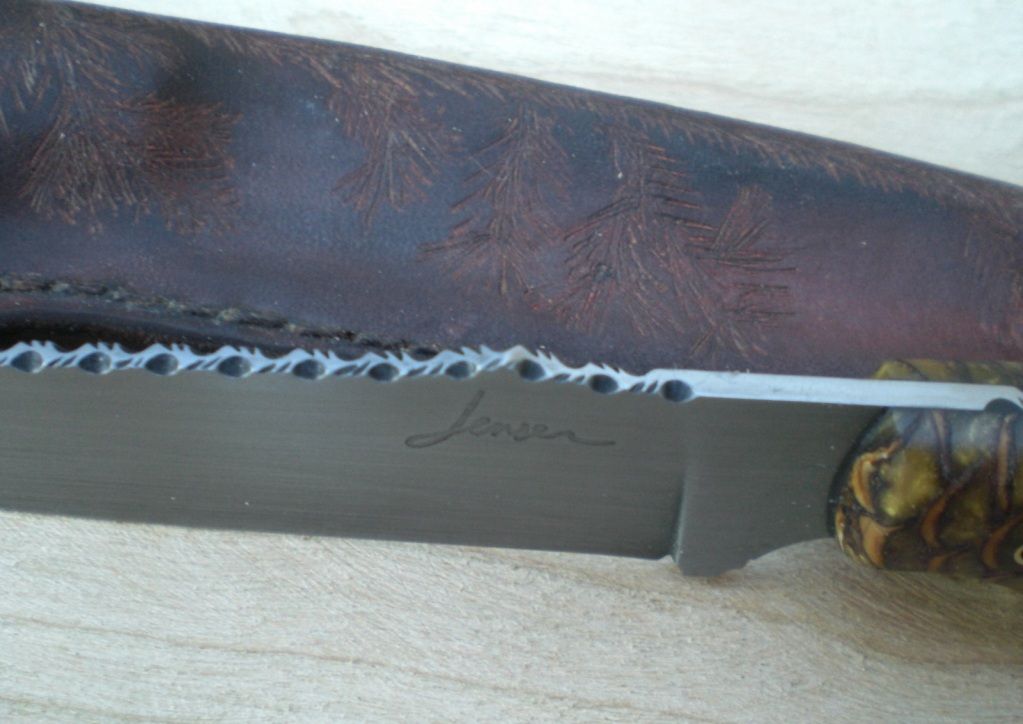
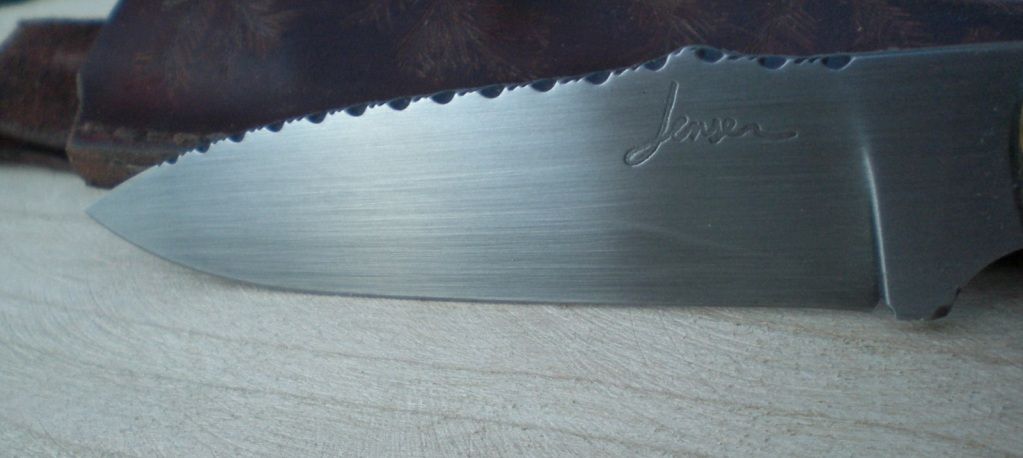
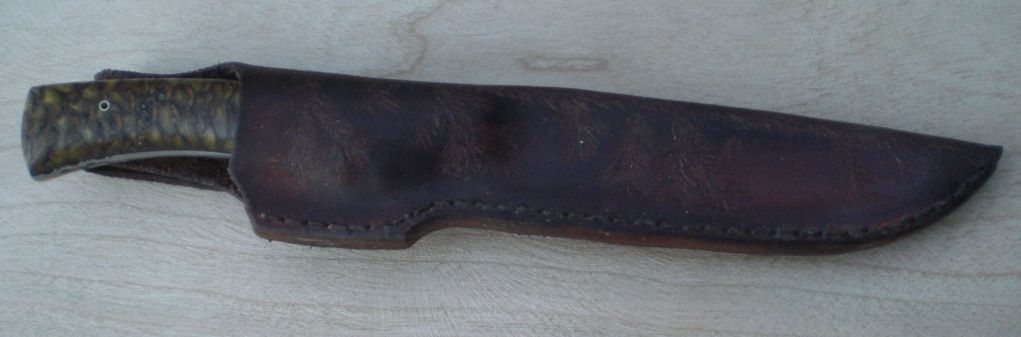
Second knife is W2 with differentially hardened with a hamon. Norway spruce cone cast in golden resin for the handle. Double vine filework with cuts on blade spine cold blued. Brass pins in chamfered holes. Norway spruce branch design on the sheath. Sheath work improved since the one for the first knife above, in my opinion.
|
|
#3
06-05-2012, 10:55 PM
|
||||
|
||||
|
Congratulations on both of your graduations, Eli! The knives look terrific and the sheaths, as you said, are getting there. You may already know this but here's some things I'd suggest to get a more complete finish on the sheaths:
Not sure about the stitching, either use a grooving tool to cut a trench to hold the stitches so the thread is even with the surface or wear gloves and pull harder when you do the stitching (or both). Get a couple of nylon burnishing tools to burnish the various edges (both wide and narrow). To do this most effectively you'll need to buy some Gum Tragacanth. After the edges are burnished, finish them off with some edge finish dye.... __________________ Your question may already have been answered - try the Search button first!   
|
|
#4
06-05-2012, 11:50 PM
|
||||
|
||||
|
Got my groove cutter in the mail today. Might get an edge beveling knife too instead of free handing it on the 4x36. I'll look into those other things.
|
|
#5
06-06-2012, 08:45 AM
|
||||
|
||||
|
Yes, I forgot about the skiving tool. They make one that isn't a knife, just a V slot on the end of one of those typical screwdriver design tools. Push it along the edge and you get a perfectly beveled edge every time. Much better than a skiving knife for that particular job ...
__________________ Your question may already have been answered - try the Search button first!
|
|
#6
06-06-2012, 11:02 AM
|
|||
|
|||
|
As Ray said, get an adjustable groover. Glue up your sheath and then sand the edges even on your 4X36. Use the groover on both sides to cut grooves for the thread to sit in. Then lay out your holes with a stitch wheel and punch them withan awl or needle. Below is a jib that I rigged up on my drill press.
IMG_0067.JPG It's not easy to see on the board that is clamped to the drill press table but there is a hole in the center of the board and one just inside the edge. I use the center hole on work that will may flat, like punching the holes for sewing on belt loops, and the on the edge for jobs that don't, like the edge of a folded pouch sheath. The needle is a drapery needle that I go at a local crafts store that is a little larger than the needle I sew with. Unlike the photo, make sure that it's chucked up squarely in the chuck (oops). The holes are not drilled in rather the arm on the press is only used to push the needle through the leather. I don't even plug the drill press in when I'm doing this job. Lay out the stitches and press the needle holes from the front side. If everything is square then the holes should line up in the grooves on both sides. If not, you go back and from the front side use an awl to readjust the holes. You then use a tooling spoon to work over the old holes that were out of line. I've only had to do this once on a curved section of a sheath. I'm not sure if the curve had anything to do with it or if that just where things got out of wack. If you drill your needle holes, which I will do with lacing only, you will not be able to correct like that. I don't cut grooves if I'm lacing. A stitching pony is great to have for sewing. It will give you that third had that you need. For burnishing the edge of the sheath, after I have it sanded even and stained, I moisten the edge with water and burnish it with my burnishing tool, which in my case is a wart hog's tooth that has some smooth surface on it. I then coat the edge with gum tragacanth and burnish again. You can also do the same thing on the exposed flesh side of the leather to give a smoother appearance. Burnish all exposed edges, not just where the welt is, for that extra finished touch. The idea of using a drill press in sewing is based on something Tim Lively showed in one of his videos and the burnishing was from Chuck Burrow's video on sheath making. Doug __________________ If you're not making mistakes then you're not trying hard enough
|
|
#7
06-06-2012, 11:06 AM
|
|||
|
|||
|
Forgot to say that I really like those knives. The file work is fantastic and I love the pine cone handle. Almost makes me with I had pines in my yard.
Doug __________________ If you're not making mistakes then you're not trying hard enough
|
|
#8
06-08-2012, 06:32 AM
|
||||
|
||||
|
Congrats Eli. I, too, gradutated a forester in Wildlife Bio-R/D (UGA '72). Great education, was learning to make knives and muzzleloaders at night while going. Ran the school sawmill between classes.
Nice filework and overall finish on the knives. The pine cone is interesting, what species? On the leather, good advice above. The groover will improve your alignment, but give yourself a little more border from the stitching. It will stiffen the sheath a bit more along the welt and give you more room for "adjustments". Get an overstitch wheel to set your spacing on your stitches. I have also found that working the edge with a creaser after stitching will pack-in your stitch, line closing the holes and even up the edge-to-stitch parallel for a more pleasing professional look. You can burnish the edges with most any hard material, I have several different shaped bone folders from various mediums - antler tips, rib bone, cocabola, delron, etc. I have found that doing the final shaping of the edge on my belt grinder with a worn out 220 belt works really well and is fast. Just keep a moist sponge hand to dampen the edge a bit as you go and the final burnishing will be a snap. I also use the 220 to sand/burnish any expose flesh side of the leather for a more finished look. ps - like the way you tied the pine boughs carving in with the handle material.....sheath should compliment the knife. __________________ Carl Rechsteiner, Bladesmith Georgia Custom Knifemakers Guild, Charter Member Knifemakers Guild, voting member Registered Master Artist - GA Council for the Arts C Rex Custom Knives Blade Show Table 6-H
|
|
#9
06-08-2012, 09:39 AM
|
||||
|
||||
|
Its Picea abies from what I've been told from the place I bought them from.
Thanks for all the tips. I'm in the process of making a pistol holster for practice.
|
|
#10
06-09-2012, 09:51 AM
|
||||
|
||||
|
Awesome work, Eli. Question: how did you attach the bolsters? Are there hidden pins inside? I love the pine cone grips. Looks like carp scales.
__________________ Chris K. Two Mountains Forge Delta, BC, Canada www.twomountainsforge.com
|
|
#11
06-09-2012, 10:15 AM
|
|||
|
|||
|
I really like your work man. The file work is very crisp and even. I don't even know what to say about that pine cone handle! I think I fell in love with the look of that stuff
 Congrats on th grads!
|
|
#12
06-09-2012, 10:39 AM
|
|||
|
|||
|
Wow! Those are some amazing knives! I am about to graduate as well. I just started my first knife. I can only hope that one day they can look like that. LOVE the pine cone handle, was it your first attempt? I would like to know how well they hold up.
Matt
|
|
#13
06-09-2012, 10:39 AM
|
||||
|
||||
|
Thanks guys. They are attached by regular pins, not hidden. I took a HSS conee cutting bit to the holes first, peened them heavily. They aren't going anywhere.
|
|
#14
06-15-2012, 03:03 PM
|
||||
|
||||
|
Good looking knives overall. I envy your file work. I have never sat down to learn how to do a vine or the like, guess I just aint got the paitence
That pine cone handle material intrigues me! Was that purchased scales or did you manufacture the slab? I saw some of those on a knife in the back of Blade Mag the other day and really like that look. Good job! __________________ Dennis "..good judgement comes from experience, experience comes from poor judgement.." -Gary McMahan, a cowboy poet and good dancer. http://www.facebook.com/home.php#!/p...24112090995576
|
|
#15
06-16-2012, 01:54 PM
|
||||
|
||||
|
It was purchased from Ankrom Exotics
|
|
| Tags |
| arrow, bee, blade, bolsters, brass, cold, design, guard, hamon, handle, holster, knife, knife making, knives, made, nylon, pins, press, resin, rivets, sheath, sheaths, spacers, tools, vine |
| Currently Active Users Viewing This Thread: 1 (0 members and 1 guests) | |
|
|
 Similar Threads
|
||||
| Thread | Thread Starter | Forum | Replies | Last Post |
| Niece's graduation gift | Drac | The Display Case | 1 | 05-31-2011 09:44 PM |
| Engraved Sterling Bracelets...for graduation! | Jim Small | Fine Embellishment | 9 | 04-18-2006 09:22 PM |
| Eagle Scout Graduation Knife | Dusty Moulton | The Display Case | 14 | 07-30-2004 10:09 PM |


 Linear Mode

