|
|
|||||||
| Ed Caffrey's Workshop Talk to Ed Caffrey ... The Montana Bladesmith! Tips, tricks and more from an ABS Mastersmith. |
 |
|
|
Thread Tools | Display Modes |
|
#16
 07-10-2008, 03:26 PM
|
||||
|
||||
|
Does the 'pre-distortion' come from the angled cut, is that where it's being introduced? If so, it seems to me that the cuts would have to be made at 3/4" intervals (nd at a precise angle) rather than the 1.5" that I originally assumed. Even if I have that correctly (doubtful!) how is this process any better or easier than conventional tiling?
__________________ Your question may already have been answered - try the Search button first!   

|
|
#17
07-10-2008, 03:40 PM
|
||||
|
||||
|
In my opinion, the beauty of this method is that there is nearly no waste, and if its "dry welded" you will not see a weld seam anywhere.
It took me about three billets to get is right. Admittedly it involves a lot of work, and you have to pay close attention to what your doing.......but its the difference between getting 3-4 blades out of a billet of mosaic, versus getting only one with accordion folding. With conventional accordion folding, about 60-70% of the billet winds up as waste.....well, at least for that billet. I keep all the cut-outs from my accordion folds and "recycle" them into my "fossil" damascus. Don't wanna run over what Bill is doing, but the "pre-distortion" is actually done prior to cutting the tiles....then after the tiles are welded, you basically UN-pre-distort the billet. The flattening to 3/4" squashes the pattern to give you a bigger surface area between the tiles to weld, then taking it down to a finished thickness of 1/4" is what restores the pattern to it's before pre-distortion appearance. Come on Bill!!! I went through trying to explain this before, and its driving me nuts again!!!  
__________________ WWW.CAFFREYKNIVES.NET  Caffreyknives@gmail.com "Every CHOICE has a CONSEQUENCE, and all your CONSEQUENCES are a result of your CHOICES."
|
|
#18
07-10-2008, 04:20 PM
|
|||
|
|||
|
Hi Ray,
OK Being the illiterate that I am I hope that I can get this across in an understandable manner. The predistortion that Ed mentiond is done when the square bar is flattened. it is cut at forty fives like this: ///////////////< pattern here, And then flipped nintey degress and reassembled like this:\\\\\\\\\\\\\\ this is looking at the narrow side. with the cut faces and the pattern now on the top and bottom and welded back together. during the welding process the pattern is streched back out to it's original shape so the cuts are more like this: \ \ \ \ \ \ \ \ with the pattern still on the top and bottom of the bar I hope that this clears things up for you if not I'll try again __________________ Bill Burke ABS Master Smith 2008
|
|
#19
07-10-2008, 06:32 PM
|
|||
|
|||
|
Hi Bill, Ray, Ed and everybody else, Yeah I get what you are talking about, by flattening the billet out to 3/4" you are distorting the pattern a little but once you have the tiles welded if you flatten the bar to 1/4" you need to draw the billet on the edge to some degree and this will ( I think ) undistort the pattern back to what you first intended> Am I thinking right about that? Bill I do have a power hammer and soon will be making a press, after I had cut the accordian on the first billet I got excited and opened it up on the horn of the anvil because I did not want to make dies for the hammer that will all be taken care of when I have the press working and it is nice and cold over here but the wind will blow yhour head off at the moment best to be in the forge and thats where I am going now. will let you all know how I get on and post some pics.
Cheers Keith
|
|
#20
07-10-2008, 07:19 PM
|
|||
|
|||
|
Keith,
the idea is to weld the tiles on the lapped joints just like in matt's last set of pictures but by pre distorting the billet and starting with thicker peices the bar can be welded and drawn out so that the pattern is back to normal and there is no need for solid center core. If you are welding the tiles on a hammer or press then you will have to work the edges to keep the bar from getting wider but if you have a rolling mill then in the process of welding and rolling out the billet the pattern will undistort almost perfectly with out working the sides of the billet __________________ Bill Burke ABS Master Smith 2008
|
|
#21
07-10-2008, 08:47 PM
|
||||
|
||||
|
Thanks Ed and Bill, I think I see it clearly now. If, in fact, I do grok the situation then the prime factor missing from the previous descriptions would be that the diagonal cuts must be spaced at some pre-calculated interval (3/4" in this case, I think) so that the pieces formed are equilateral parallelograms when seen from the 3/4" side. This would be required - or so it seems to me - in order to achieve the correct amount of un-distorting when arriving at a 1/4" finished bar.
Are we there yet? __________________ Your question may already have been answered - try the Search button first!
|
|
#22
07-10-2008, 10:02 PM
|
|||
|
|||
|
One thing to keep in mind is that at some point you have to grind the filler rod from the electrical welding off the bar. unless you weld it in a can. Or you can surface grind the bar before cutting it and then tig weld the pieces togehter without using filler rod. by the time you get it welded and drawn out there shouldn't be much sign of the tig welds left. Oh and Ray I did mention that the spacing of the cuts should be 3/4 of an inch apart just not real clearly so it is understandable that you missed it.
__________________ Bill Burke ABS Master Smith 2008
|
|
#23
07-11-2008, 08:34 AM
|
||||
|
||||
|
I miss a lot of things these days but sometimes having to look harder to find what I missed is an opportunity for an educational epiphany. Thanks for bringing this process to everyone's attention ....
__________________ Your question may already have been answered - try the Search button first!
|
|
#24
07-11-2008, 09:23 PM
|
|||
|
|||
|
I want to say thanks for sharing too. I believe I have learned something neat from all the mental and grammatical gymnastics in this thread. I'll give it a try before long. Like the TIG plan.
Matt
|
|
#26
07-12-2008, 09:09 PM
|
|||
|
|||
|
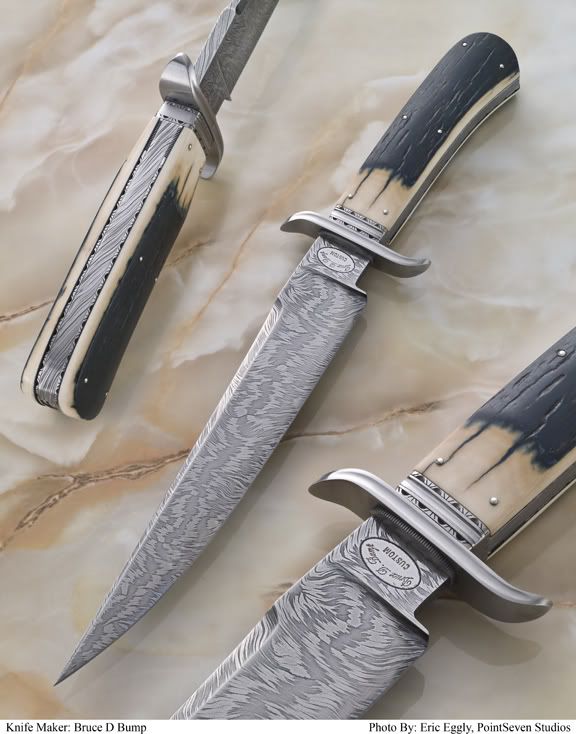
This one is a simple pattern using the tile method. It doesnt have to be mosaics to be a useful method. I used the "W" pattern here. Look at the spine, you can see the 45 degree cuts stacked. I used a wire feed welder to seal all the joints and forge welded it dry. Ive had great success with dry welds.
|
|
#27
07-12-2008, 09:23 PM
|
||||
|
||||
|
Magnificant B-Bump!! Might I ask the steel types? I can't even see any area on the blade that shows it was made of bisquits in it's earlier life.
__________________ Robert Hensarling Uvalde, Texas
|
|
#28
07-12-2008, 09:43 PM
|
|||
|
|||
|
Quote:
It is 1084 and 15n20 in a "W" pattern. I cant say enough about the tile method over accordian now. Dry welding is something you need to try too if you havent already. No flux. Maybe I'm easily impressed but I like it. I dont think a press is neccesary.
|
|
| Tags |
| blade, forge, knife |
| Currently Active Users Viewing This Thread: 1 (0 members and 1 guests) | |
|
|


 Linear Mode

