|
|
|||||||
| Ed Caffrey's Workshop Talk to Ed Caffrey ... The Montana Bladesmith! Tips, tricks and more from an ABS Mastersmith. |
 |
|
|
Thread Tools | Display Modes |
|
#1
 10-24-2008, 03:12 PM
|
||||
|
||||
|
Angle Peen
If anyone is using this type hammer, like to hear the benefits over a cross or straight peen if any. Im assuming that if your right handed you use the right angle. I've never had my hands on one so just trying to get some feedback on this from those that use them.
Thanks Jerry Fisher 
|
|
#2
10-24-2008, 03:54 PM
|
||||
|
||||
|
I use mine alot and it's better for your wrist when your doing alot of drawing. You can hold the tongs closer to your body and not fatique out your forearm.
This is one I made a couple years ago from 4142 hex bar and laminated oak and mohagany.  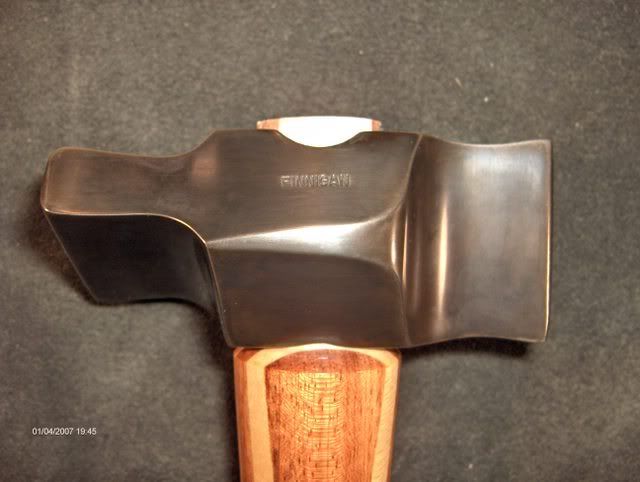
Last edited by B.Finnigan; 10-31-2008 at 09:15 PM.
|
|
#3
10-24-2008, 04:26 PM
|
||||
|
||||
|
I make, sell, and use angle peens hammers all the time. The big advantage is their ease of use. With the peen offset at a 45 degree angle, you stand naturally, rather than having to twist yourself into a ball in order to get the job done.
The "Double Drawing" hammer allows you to draw both lengthwise and side to side simply by flipping the hammer over. An added benefit is that you can draw edge bevels without having to back bend a blade. Here's a link the my Hammer page __________________ WWW.CAFFREYKNIVES.NET  Caffreyknives@gmail.com "Every CHOICE has a CONSEQUENCE, and all your CONSEQUENCES are a result of your CHOICES."
|
|
#4
10-24-2008, 06:02 PM
|
||||
|
||||
|
I love my angle peen. I used it today.....
__________________ http://www.woodchuckforge.com Avatar, Scott Taylor Memorial Scholarship Knife Photo by Bob Glassman Chuck Richards ABS J.S.
|
|
#5
10-26-2008, 09:57 PM
|
||||
|
||||
|
Mr. Caffrey,
Could you elaborate on your double drawing hammer. It appears that both peins are about the same. Im sure I'm missing something here, I do notice that the vertical angle appears a bit different. Jerry Fisher
|
|
#6
10-27-2008, 12:03 AM
|
||||
|
||||
|
They're ambidextrous. Both ends are angled.
|
|
#7
10-27-2008, 12:25 AM
|
|||
|
|||
|
Hi Brent,
I've been look'in at your hammer. I'm just wondering if both ends draw length for you while in use. Just curious, one side looks like a straight peen, and the other looks like it would also draw length (for a right hander). Thanks, Craig
|
|
#8
10-27-2008, 07:55 AM
|
||||
|
||||
|
Jerry,
On the Double Drawing hammer..... with both peens lined up (in the same direction), one side of the hammer can be used to draw things lengthwise, and by simply flipping the hammer over, the other side is used to draw out the width of an object. If the peens are set up opposite (90 degrees from each other on the same hammer head) the hammer will only work for one of the operations. The standard angle peen hammers are set up with one flat (actually domed) face, and the peen is set up for drawing material lengthwise. If your right handed, the peen must be one way for drawing lengthwise, and if your left handed the peen has to be 90 degrees the other way to work for drawing lengthwise. Basically, with one angle peen hammer, and one double drawing hammer, you have all the hammers you need to do just about any operations you need. __________________ WWW.CAFFREYKNIVES.NET Caffreyknives@gmail.com "Every CHOICE has a CONSEQUENCE, and all your CONSEQUENCES are a result of your CHOICES."
|
|
#9
10-27-2008, 09:11 AM
|
||||
|
||||
|
I have 2 of Ed's hammers and I use them both all the time. Before I got them, I was constantly trying to modify store bought stuff to work for me. Now I don't even pick up the store bought hammers.
If you have never used a custom hammer, you have now idea what you are missing!!! Steve __________________ Steven Kelly A.B.S. J.S. S.K. Knives 11407 Spotted Fawn Ln. Bigfork, Mt. 59911 (406)837-1489 www.skknives.com
|
|
#10
10-27-2008, 09:53 AM
|
||||
|
||||
|
Craig, one face is a 45 deg angle and the other is a straight peen. Both faces draw but the angled just does it more comfortably.
|
|
#11
10-28-2008, 04:22 AM
|
||||
|
||||
|
Jerry,
I don't post very often, but, this one is a must. I also own 2 of Mr. Caffery's hammers and like Steven say's you don't know what your missing. My other hammers are just a hammer collection now. I have noticed a real difference in speed and maybe its just my imagination but I don't seem to be grinding near as much. Just my 2 cents __________________ Bill Withem
|
|
#12
10-29-2008, 11:19 AM
|
||||
|
||||
|
I bought one of Ed's angle peens (not the double - yet
 ) but I would not want to be ) but I would not want to be without it  Dana
|
|
#13
10-30-2008, 10:30 AM
|
||||
|
||||
|
Thanks to Mr. Caffrey and all for the feedback on the hammers.
Jerry
|
|
#14
10-30-2008, 10:13 PM
|
|||
|
|||
|
Ed,
Is there a place on your site where you talk about making hammers (I'm not finding one)? If not, would you be willing to discuss it? Like steels, weights, faces, balance factors, how eyed and why, etc.? Mike Krall
|
|
#15
10-31-2008, 09:19 AM
|
||||
|
||||
|
Hi Mike!
I didn't get that deep into it on the website, but would be happy to tell you about the hammers. They are all made of 4140 steel, which starts out as square stock. Initially I tried to hot cut and drift the eyes. Well, 4140 is very tough stuff to hot cut...especially in that large of a cross section. After wrecking a couple of hot cuts, I had to find a new method. Now what I do is measure/lay out everything on the piece of stock, then I drill two 9/16" holes that are touching (no web between them). Each piece of 4140 is welded to a length of rebar (for a handle), then the eye is drifted out. (all the eyes are drifted to fit a large Bladesmith Hammer handle of the 16" long variety, that are available in most hardware stores). Next the peen is formed with in the press with a set of dies I built specifically for the task (had to use 52100 for the dies because mild steel dies would just deform). Next I go to the air hammer and work the flats and create the face. After that the hammer heads are normalize, then annealed. Next comes the rough grinding, where I refine the shape down to a 220 grit finish prior to hardening and tempering. Due to the nature of 4140, and the large size of the pieces, I harden them in used motor oil, in a 35 gallon tank. The heads are sensitive to being cooled too rapidly, and I have a pile of hammer heads that I cracked because of using the wrong quenchant, or not using enough quenchant. It takes about 4-5 mins of quench time for each hammer due to the mass involved. Next they go into the tempering oven for 3, 2 hour cycles. One of the things that I think makes my hammers better than most is that I strive to ensure that each hammer face is going to be softer than the anvil it will be used on. Making a ding in the face of your anvil, even a small one, is simply a massive job to repair. By making the hammer face softer than the anvil face, if you make a miss-lick, and dent the hammer face, its a very simply and quick matter to go to the belt grinder and clean it up/polish the face back to new condition. I offer two basic sizes of hammers. The smaller is approx. 2 lb, and the larger is 2 1/2-3 lbs. Because they are hand made, no two are going to be the exact same weight, and there will be slight differences in each. I personally think the handles make all the difference....I use only Hickory handles, and "split" them lengthwise about 1/2 way. This helps absorb shock that would otherwise be going back into the user's hand/arm. When swinging the hammer, this configuration also gives the handle(s) a slight amount of flex, and due to the flex, gives the hammer "snap" at the end of a stroke on heavier blows. Before someone asks....NEVER, NEVER, NEVER use fiberglass or steel handles for a forging hammer! Doing so will only ensure that you get "tennis elbow" in short order, and that you get tired much more quickly than you should. Both of these handle materials do nothing but transmit the shock of a hammer blow right up the handle and into your hand/arm. As far as the face goes, it should be domed, and as smooth and clean as possible. Any marks on the hammer face will be transferred into/onto your work. All the hammers that leave here have the faces polished to a nearly mirror finish. With a hammer, balance has more to do with how the handle fits the individual's hand than actual balance of the tool. I would expect that each person who purchases one of my hammers would have to grind/sand a little off the handle until it feels good in their hand. I personally like my hammer handles slightly flat on the sides, which gives me more control. How an individual holds a forging hammer is key also.... you DO NOT hold or use a forging hammer as you would a framing hammer. Most folks, when using a framing hammer place their thumb on top of the handle, do this with the repetitive motion used during forging and you will quickly develop carpal tunnel! The grip on a forging hammer should be loose, with your index and middle finger tips touching your thumb. The hammer should be allowed to "rotate" through its motion in the cradle you form by doing this. If your new to swinging a forging hammer, you will form a blister on the heel of your hand, that will eventually turn into a callous......which lets you know your doing it correctly. Hopefully that will explain most of it, and if not, just ask away! __________________ WWW.CAFFREYKNIVES.NET Caffreyknives@gmail.com "Every CHOICE has a CONSEQUENCE, and all your CONSEQUENCES are a result of your CHOICES."
|
|
| Tags |
| blade, forge, forging, knife |
| Currently Active Users Viewing This Thread: 1 (0 members and 1 guests) | |
|
|


 Linear Mode

